MongoDB adapter
How it works
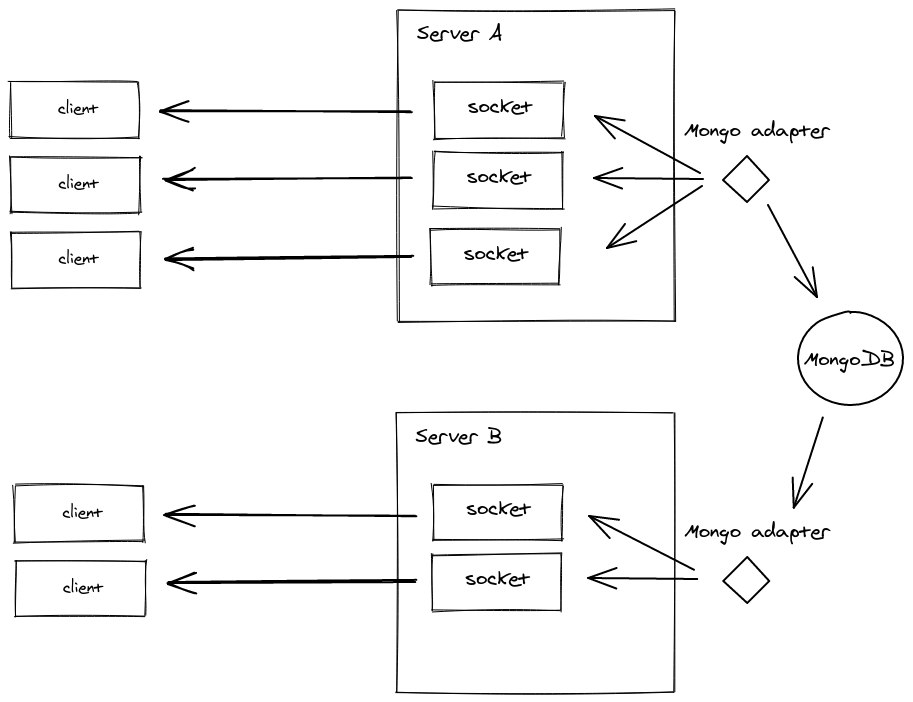
The MongoDB adapter relies on MongoDB's Change Streams (and thus requires a replica set or a sharded cluster).
Every packet that is sent to multiple clients (e.g. io.to("room1").emit() or socket.broadcast.emit()) is:
- sent to all matching clients connected to the current server
- inserted in a MongoDB capped collection, and received by the other Socket.IO servers of the cluster

The source code of this adapter can be found here.
Installation
npm install @socket.io/mongo-adapter mongodb
For TypeScript users, you might also need @types/mongodb.
Usage
There are two ways to clean up the MongoDB documents that are created by the adapter:
Usage with a capped collection
const { Server } = require("socket.io");
const { createAdapter } = require("@socket.io/mongo-adapter");
const { MongoClient } = require("mongodb");

const DB = "mydb";
const COLLECTION = "socket.io-adapter-events";

const io = new Server();

const mongoClient = new MongoClient("mongodb://localhost:27017/?replicaSet=rs0", {
  useUnifiedTopology: true,
});

const main = async () => {
  await mongoClient.connect();

  try {
    await mongoClient.db(DB).createCollection(COLLECTION, {
      capped: true,
      size: 1e6
    });
  } catch (e) {
    // collection already exists
  }
  const mongoCollection = mongoClient.db(DB).collection(COLLECTION);

  io.adapter(createAdapter(mongoCollection));
  io.listen(3000);
}

main();
Usage with a TTL index
const { Server } = require("socket.io");
const { createAdapter } = require("@socket.io/mongo-adapter");
const { MongoClient } = require("mongodb");

const DB = "mydb";
const COLLECTION = "socket.io-adapter-events";

const io = new Server();

const mongoClient = new MongoClient("mongodb://localhost:27017/?replicaSet=rs0", {
  useUnifiedTopology: true,
});

const main = async () => {
  await mongoClient.connect();

  const mongoCollection = mongoClient.db(DB).collection(COLLECTION);

  await mongoCollection.createIndex(
    { createdAt: 1 },
    { expireAfterSeconds: 3600, background: true }
  );

  io.adapter(createAdapter(mongoCollection, {
    addCreatedAtField: true
  }));
  io.listen(3000);
}

main();
Options
| Name | Description | Default value | Added in |
|---|---|---|---|
uid | the ID of this node | a random id | v0.1.0 |
requestsTimeout | the timeout for inter-server requests such as fetchSockets() or serverSideEmit() with ack | 5000 | v0.1.0 |
heartbeatInterval | the number of ms between two heartbeats | 5000 | v0.1.0 |
heartbeatTimeout | the number of ms without heartbeat before we consider a node down | 10000 | v0.1.0 |
addCreatedAtField | whether to add a createdAt field to each MongoDB document | false | v0.2.0 |
Common questions
- Do I still need to enable sticky sessions when using the MongoDB adapter?
Yes. Failing to do so will result in HTTP 400 responses (you are reaching a server that is not aware of the Socket.IO session).
More information can be found here.
- What happens when the MongoDB cluster is down?
In case the connection to the MongoDB cluster is severed, the behavior will depend on the value of the bufferMaxEntries option of the MongoDB client:
- if its value is
-1(default), the packets will be buffered until reconnection. - if its value is
0, the packets will only be sent to the clients that are connected to the current server.
Documentation: http://mongodb.github.io/node-mongodb-native/3.6/api/global.html#MongoClientOptions
Latest releases
0.2.0(2022/07/24): GitHub release / diff0.1.0(2021/06/01): GitHub release
Emitter
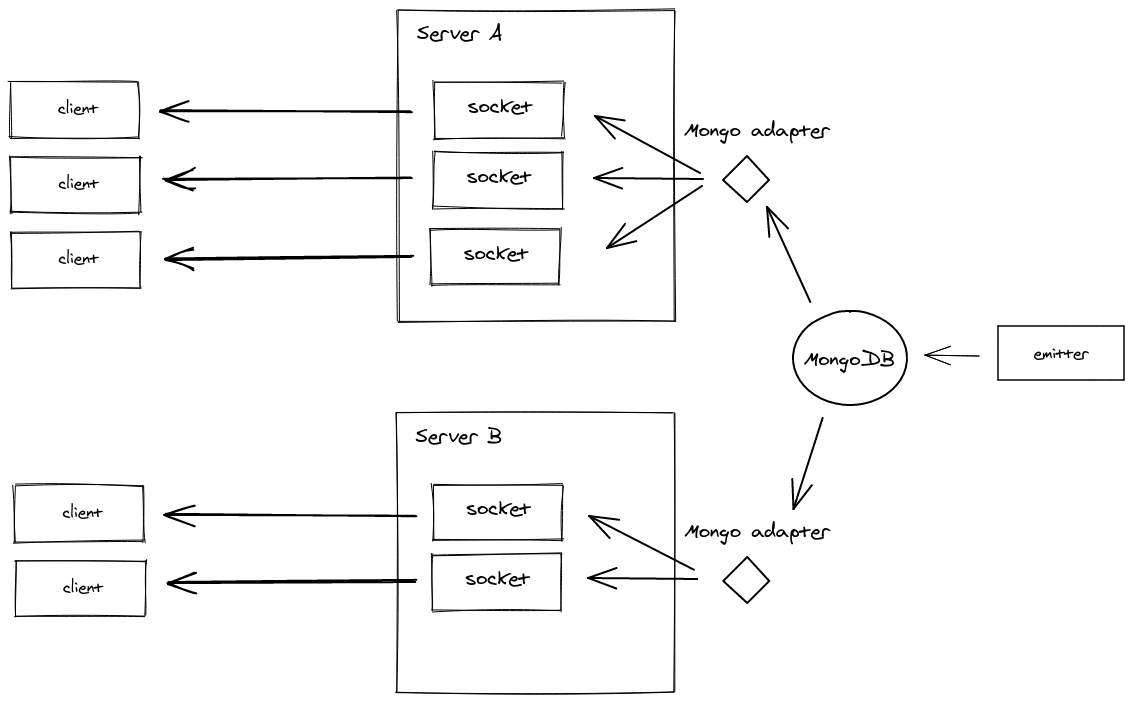
The MongoDB emitter allows sending packets to the connected clients from another Node.js process:

Installation
npm install @socket.io/mongo-emitter mongodb
Usage
const { Emitter } = require("@socket.io/mongo-emitter");
const { MongoClient } = require("mongodb");

const mongoClient = new MongoClient("mongodb://localhost:27017/?replicaSet=rs0", {
  useUnifiedTopology: true,
});

const main = async () => {
  await mongoClient.connect();

  const mongoCollection = mongoClient.db("mydb").collection("socket.io-adapter-events");
  const emitter = new Emitter(mongoCollection);

  setInterval(() => {
    emitter.emit("ping", new Date());
  }, 1000);
}

main();
Please refer to the cheatsheet here.